
If you want to do anything in Solana, trade memecoins, hold tokens, mint NFTs, use a DEX, you need a wallet. And for most people getting into the Solana ecosystem, that wallet is Phantom.
This guide walks you through setting up a Phantom wallet from scratch, on desktop or mobile, in plain English. No jargon you have to Google, no steps skipped. We’ll also cover the security stuff that actually matters, because the difference between keeping your crypto and losing all of it usually comes down to a few things you do (or don’t do) in the first five minutes.
Let’s get into it.
What is Phantom, quickly

Phantom is a self-custodial crypto wallet. Self-custodial means you hold the keys, not a company. No exchange, no bank, nobody can freeze your funds or lose them for you. The flip side: nobody can recover them for you either, so the responsibility is yours. We’ll come back to that.
It started as the go-to wallet for Solana and has since gone multi-chain. As of 2026 it supports Solana, Ethereum, Base, Polygon, Bitcoin and a few newer networks, all in one app. It works as a browser extension (Chrome, Firefox, Brave, Edge) and as a mobile app (iOS and Android).
Step 1: Download Phantom (from the right place)
This is the single most important step to get right, so read it twice.
Only ever download Phantom from the official source: phantom.com (or phantom.app). On mobile, only from the official App Store or Google Play listing, and check the publisher is Phantom Technologies.
Fake Phantom extensions and apps are one of the most common ways people get their wallets drained. A scammer makes a convincing clone, you install it, you enter your details, your funds are gone. Bookmark the real site and use the bookmark every time.
- Desktop: go to phantom.com, click download, pick your browser, add the extension.
- Mobile: search “Phantom” in the App Store or Play Store, confirm the publisher, install.
Do not download a wallet from a link someone DMs you. Do not download it from an ad. Go to the official site yourself.
Step 2: Create a new wallet
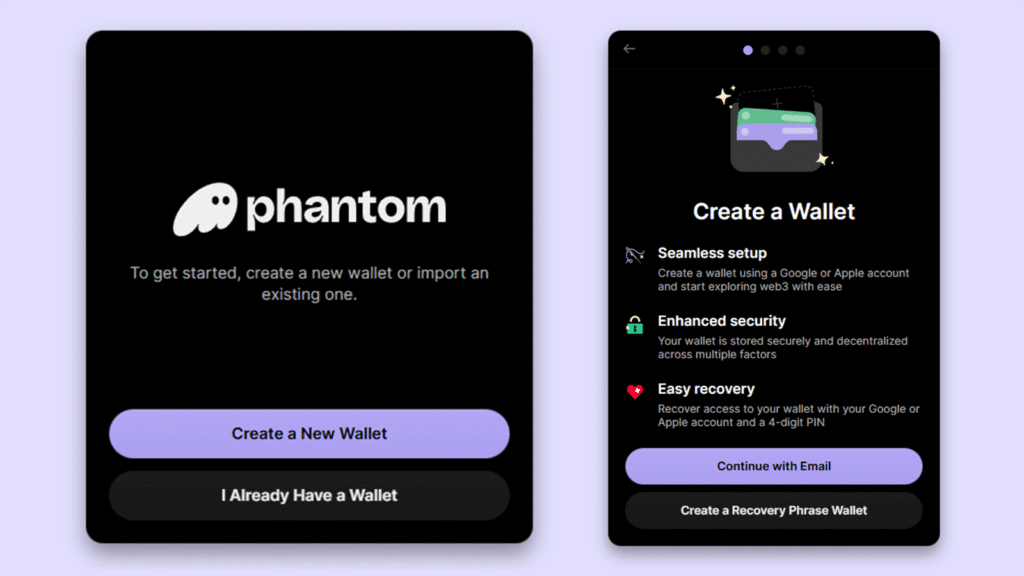
Open the extension or app and click Create a New Wallet. In 2026, Phantom gives you two ways to do this:
Option A: Seedless (sign in with Google or Apple + a PIN). This is the newer, beginner-friendly route. You sign in with your Google or Apple account and set a four-digit PIN, and Phantom handles the key management for you in the background. You’d use your email and PIN to restore the wallet on a new device. It’s easier and harder to lose, but you’re trusting that login as part of your security.
Option B: Recovery phrase (the classic, fully self-custodial route). Phantom generates a 12-word Secret Recovery Phrase that is your wallet. This is the most “your keys, your coins” option, and it’s what most serious users choose. We’ll assume this route for the next step, because the security stuff matters most here.
Either way, you’ll then set a password (this unlocks Phantom on your current device, it’s not the same as your recovery phrase) and, on mobile, you can turn on Face ID or fingerprint unlock.
Step 3: Back up your Secret Recovery Phrase (do not skip this)
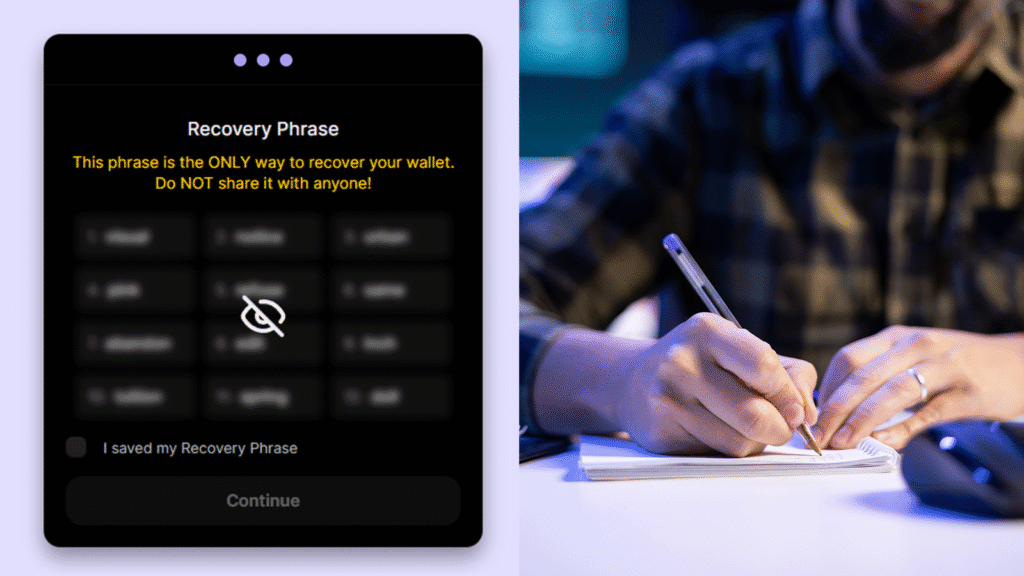
If you chose the recovery phrase option, Phantom shows you 12 words. These 12 words are your wallet. Anyone who has them can take everything. If you lose them and lose access to your device, your crypto is gone forever. There is no “forgot password,” no support team that can recover it. That is the trade-off for actually owning your money.
So here’s how to handle them properly:
- Write them down on paper. Physically. With a pen.
- Never store them digitally. No screenshots, no notes app, no photos, no cloud, no email, no password manager, no “I’ll just text it to myself.” Malware scans for exactly this.
- Store the paper somewhere safe and offline. A drawer is okay, a safe is better.
- Consider a second copy in a different location, in case the first is lost or destroyed.
- Never tell anyone the words. Phantom will never ask you for your recovery phrase. Their support will never ask. Anyone who asks is scamming you. Full stop.
Confirm the phrase when Phantom prompts you, and your wallet is live.
Step 4: Fund your wallet
An empty wallet isn’t much fun. To get crypto in, you’ve got two main routes:
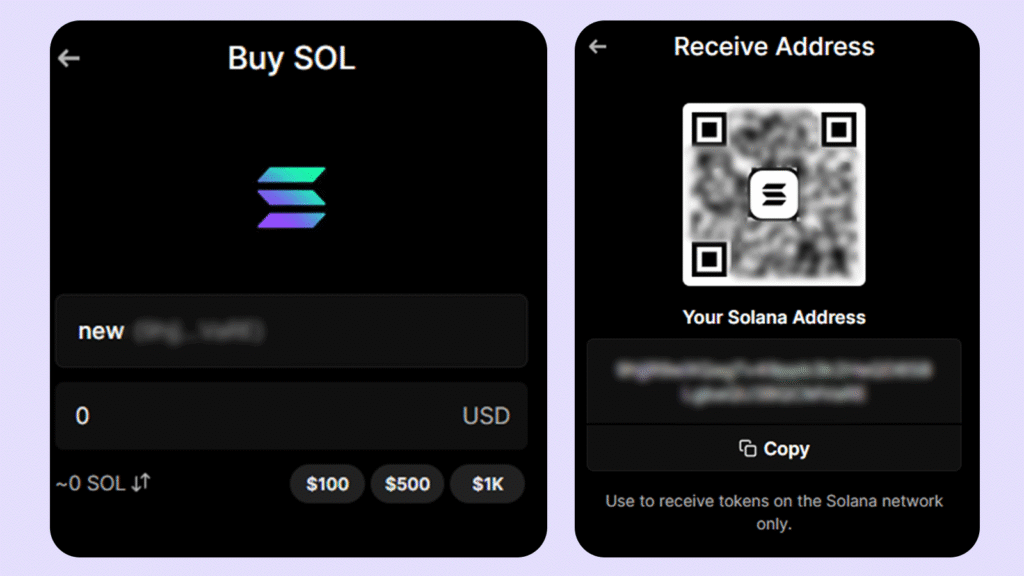
Buy directly in the app. Phantom has built-in on-ramps (like MoonPay or Coinbase) that let you buy crypto with a card straight into your wallet. Easiest for total beginners, though the fees are usually a bit higher.
Transfer from an exchange. If you’ve bought SOL (or ETH, etc.) on an exchange like Coinbase, Binance or Kraken, you can withdraw it to Phantom:
- In Phantom, hit Receive, pick the right network (e.g. Solana), and copy your wallet address.
- On the exchange, go to withdraw, paste your Phantom address, select the matching network, and send.
One critical warning: make sure the network matches. Sending Ethereum to a Solana address (or vice versa) can mean your funds are lost permanently. Always double-check, and send a small test amount first when using a new address.
Step 5: Lock it down (the security settings that matter)
Before you start aping into anything, spend two minutes here. It’s the cheapest insurance you’ll ever buy.
- Turn on biometric / auto-lock. Settings > Security. Face ID or fingerprint, plus auto-lock after a few minutes of inactivity.
- Be careful what you connect to. When a site asks to connect your wallet, only approve ones you trust. Malicious sites can request approvals that drain you. Read what you’re signing. You can review and remove connected sites in Settings > Trusted Apps.
- Ignore random NFT airdrops with links. A classic scam: an unknown NFT lands in your wallet, its description links to a site that asks you to “claim,” and approving it drains your funds. Don’t interact with unsolicited stuff.
- Verify URLs, always. Bookmark phantom.com. Never connect your wallet to a site you reached from an email or DM.
The thing nobody tells beginners: a hot wallet is not a vault
Here’s the honest bit. Phantom is a “hot wallet,” meaning it lives on a device connected to the internet. That’s exactly what you want for active use: trading, minting, swapping, messing about in the trenches. It’s convenient and fast.
But “connected to the internet” also means it’s the most exposed your crypto can be. If your device gets compromised, if you approve the wrong transaction, if you fall for a slick phishing site, a hot wallet can be drained in seconds. It happens to experienced people, not just beginners.
So the rule of thumb the people who’ve been around use: keep your spending money in your hot wallet, and your serious money somewhere it can’t be touched online.
That “somewhere” is a hardware wallet.
A hardware wallet (also called cold storage) is a small physical device that holds your private keys completely offline. Your keys never touch the internet, even when you make a transaction, the signing happens on the device itself, so a hacker would need the physical device and your PIN to get anything. For any amount of crypto you’d genuinely be upset to lose, this is the difference between “I got phished” being an annoyance and being a catastrophe.
The most widely used and trusted hardware wallets are made by Ledger. They connect directly to Phantom, so you get the best of both: Phantom’s easy interface for actually using your crypto, with the security of keys that live offline on the Ledger. You approve transactions on the physical device, which means even if your computer is fully compromised, your funds stay safe.
If you’re holding meaningful money in crypto and you don’t have one yet, it’s the single highest-impact security upgrade you can make. You can check out Ledger here.
To be clear: you don’t need a hardware wallet to start. Set up your Phantom, keep a small amount in it, learn the ropes. But the moment your bag is worth protecting, get it off the hot wallet and onto cold storage. Future you will be grateful.
You’re set up. Now what?
That’s it, you’ve got a working Phantom wallet. You can send and receive crypto, swap tokens, connect to Solana dApps, collect NFTs, and explore the ecosystem. Take it slow, double-check addresses, never share your seed phrase, and treat every “connect wallet” request with a bit of suspicion.
Welcome to self-custody. It’s a bit more responsibility than leaving your coins on an exchange, but it’s the whole point of crypto: your keys, your coins, nobody in the middle.
This guide is for educational purposes only and is not financial advice. Crypto is risky, you can lose money, and you’re responsible for your own security. Some links in this article are affiliate links, meaning we may earn a commission if you buy through them, at no extra cost to you. We only recommend products we genuinely think are worth it. See our affiliate disclosure for more.